Manually finding drivers for Windows takes forever. And sometimes you still don’t find what you need. Driver Easy changes all that…
It scans your computer, tells you what drivers are missing or outdated, then downloads them all, in one go. All you have to do is click your mouse button 3 times! Then, once they’re downloaded, just click Install on each, and you’re done.
If you're mucking around with a new Windows installation, you're probably going to run into driver headaches.
No matter whether you're installing a fresh copy of Windows on a freshly built rig or simply upgrading your PC to a new version of Windows, the OS fails to properly identify all of the hardware connected to the system more often than not. I typically like to download drivers for all of the major components in a PC before I even begin an OS installation, but inevitably a motherboard will have an obscure controller on-board or the system will have a non-descript add-in card that Windows doesn’t recognize.
People deal with driver problems in different ways. Some will hit a motherboard manufacturer’s website and search for the mobo, in hopes of identifying a component by the perusing the motherboard’s manual or spec sheet. Some folks resort to yanking the rig apart—ick—and searching the web for random part numbers on chips or cards they don’t recognize. You’ll likely have some success using either method (I have), but there is a much better way to identify unknown devices in Windows—and you don’t have to whip out any tools to do it.
Delving into the unknown
It may not be obvious, but Windows give you all the information you need to identify unknown and unrecognized devices in Device Manager if you know where to look.
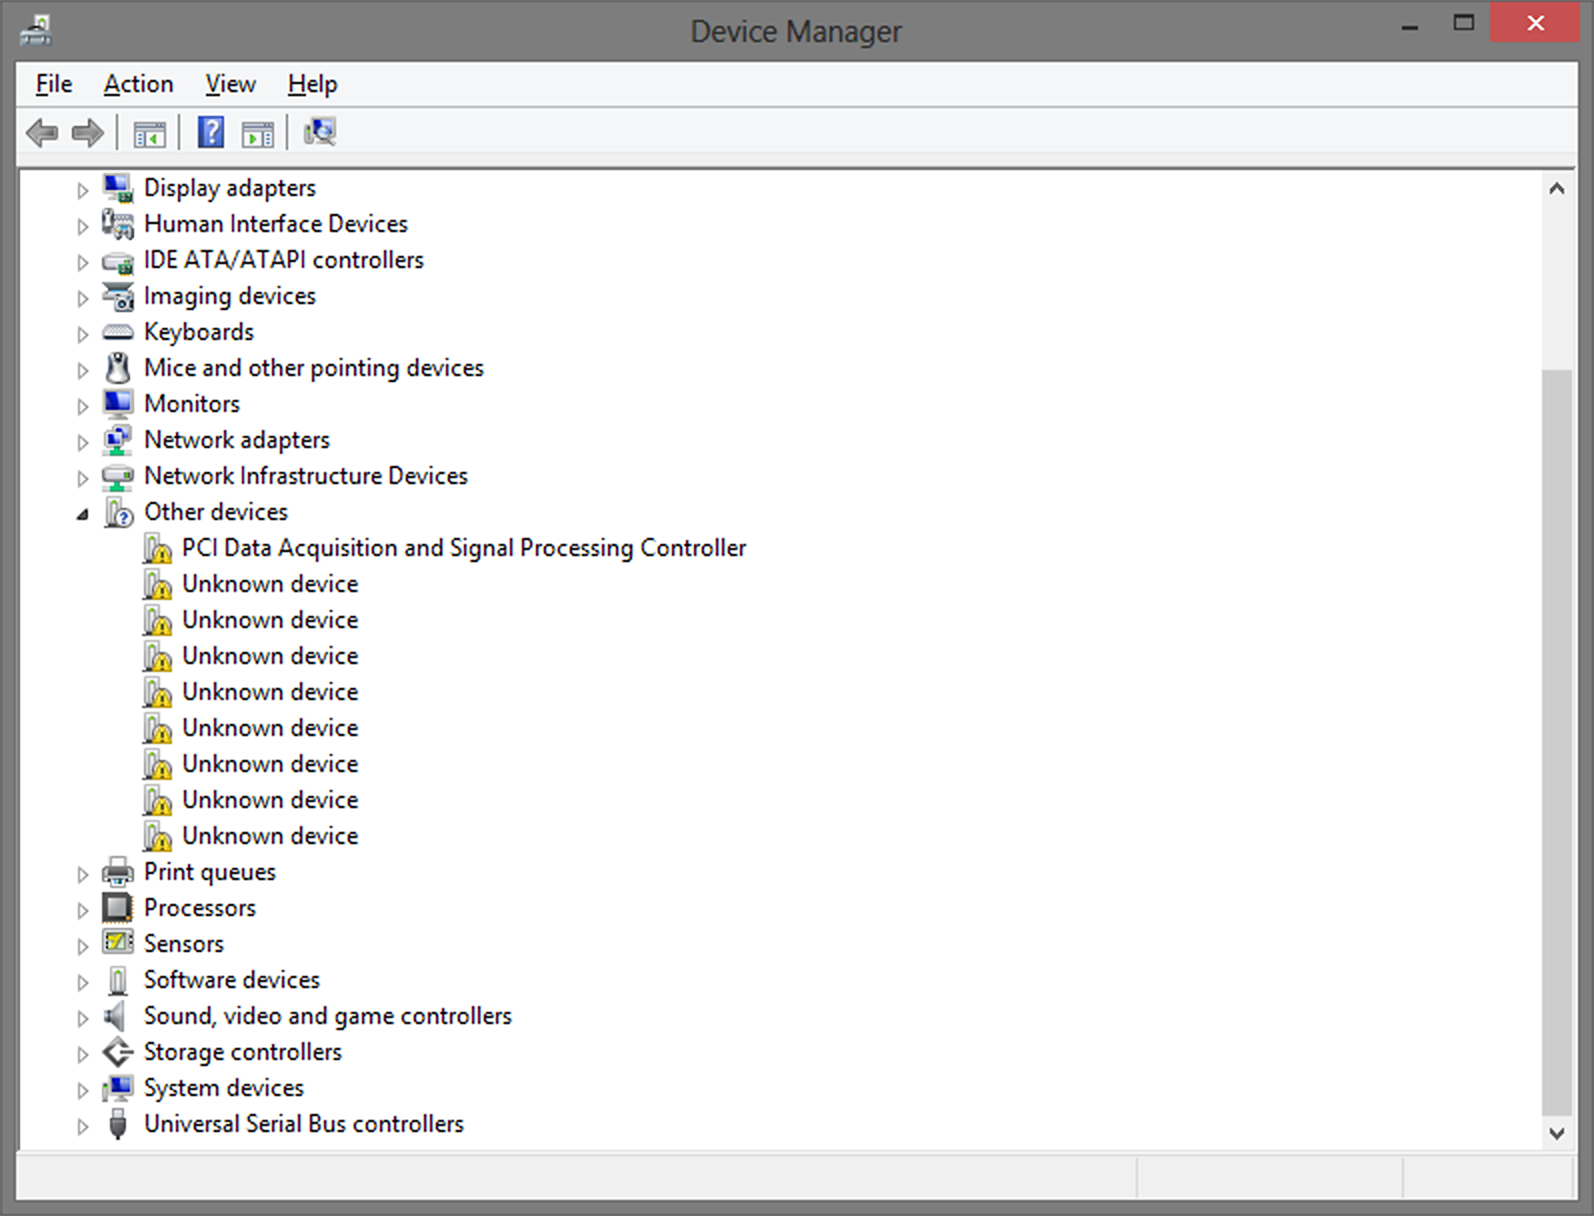
If you’ve just installed Windows and the Device Manager is loaded with “Unknown devices” or “Other devices” that are in an error state or without any drivers installed, don't fret! You’re only a few clicks away from ascertaining all of the information you need to identify the device and download its drivers.
Windows will usually brand all of the unrecognized devices in Device Manager with a black exclamation point (!) on a yellow sign. If you’re lucky, the device’s name will be listed and you can simply search for its drivers. Otherwise, the device will most likely be labeled an “Unknown device,” which is not very helpful.
The detective work
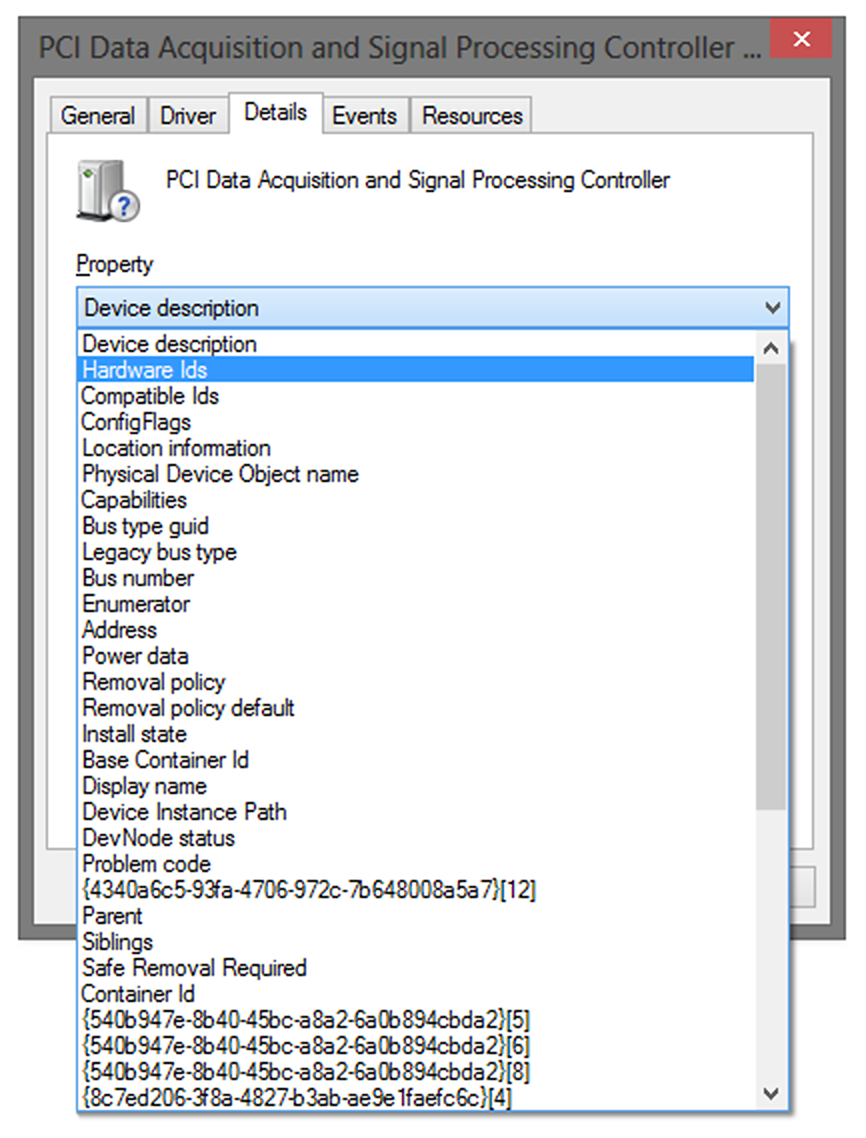
Every piece of hardware in a Windows system has a unique hardware identifier. They’re not immediately visible in Device Manager, but they can found with a little digging. (Click to enlarge.)
To find drivers for hardware that Windows refuses to recognize, open Device Manager (a search from the Start menu or Windows 8 Start screen brings it up lickity-split), right-click on the listing for the Unknown Device, select Propertiesfrom the context menu, and then click on the Details tab at the top of the resulting window.
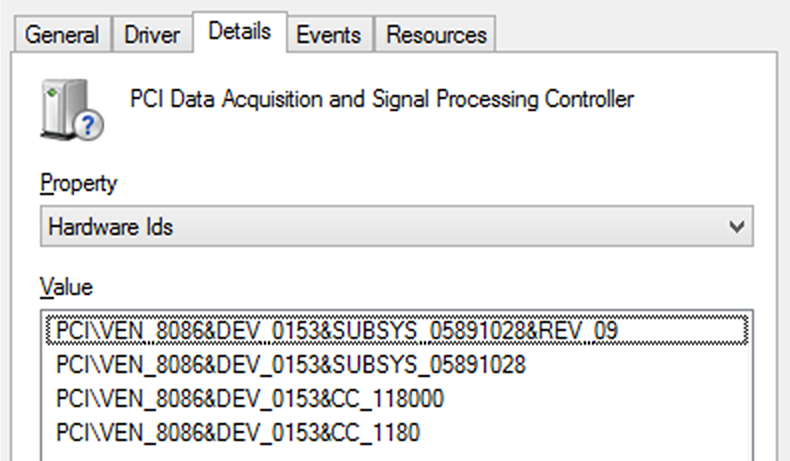
On the Details tab, you’ll see a drop down menu labeled “Property”. The items listed in that drop down menu will offer up a wealth of information about the mysterious device, but it’s the Hardware IDs that are most relevant to this discussion. Select Hardware IDs from the drop down menu and the “Value” field below will populate with a list of values. Consulting the Oracle—excuse me—searching Google for one of the values listed in the Window will usually yield the device’s identity.
ID’ing the suspect
Hardware IDs will typically consist of long strings of characters.
To easily search for drivers for a particular Hardware ID, right-click on the top-most value (usually the one with the longest string of characters) and choose Copy from the menu. Then simply paste that value into your favorite search engine. I typically have the best luck by searching for a Hardware ID along with the OS version and the words “drivers” or “driver”, and “download.”
For example, when installing Windows 8.1 on a Dell XPS 12 recently, I had a number of unknown devices listed in device manager. One of the Hardware Ids was:
PCI\VEN_8086&DEV_0153&SUBSYS_05891028
So, I did a search for “PCI\VEN_8086&DEV_0153&SUBSYS_05891028 Windows 8.1 driver download”. One of the very first results was for an Intel Dynamic Platform & Thermal Framework Driver. I downloaded and installed the driver, and bingo! It did the trick.
It’s not rocket science, but being able to quickly identify and find drivers for unknown devices in Windows can save a lot of time, especially if you’re constantly upgrading or building systems. If you’ve got any similar tips, we’d love to hear them; please comment below and give a fellow reader a hand.
If you haven’t installed Windows 10 on your PC before, you’ll have to perform an upgrade first before you can clean install. If this doesn’t make any sense, that’s because Microsoft never makes licensing easy, even when there’s a free version. Once you’ve performed the upgrade and activated your Windows 10 upgrade on a PC, Microsoft will associate your unique hardware ID with an activated Windows 10 license, and you can reinstall as you see fit. But not until you’ve upgraded Windows 7 or 8 to Windows 10 and then activated.
Just keep in mind that Windows 10 is only provided for free as an upgrade. You can’t clean install it, there are no keys at this point. Unless you use our clean install workaround.
Step 1: Download the Windows 10 ISO image from Microsoft’s web site. Alternatively you can download the web installer from the same page and just choose to upgrade your PC, which is the easiest option.
Step 2: If you are installing on a regular PC with Windows already on it, you’ll be prompted immediately to start the upgrade process. Alternatively, you can burn it to an optical disk orcreate a bootable USB flash drive. Otherwise, just attach the ISO image using the virtual machine software of your choice (assuming your virtual machine already has Windows 7 or 8 installed).
Step 3: Install it mostly by clicking the Next button, making sure to choose Upgrade when prompted. If you want to clean install, follow our clean install instructions instead.
For posterity, here are all of the installation steps if you’re booting from a flash drive, although you could just remember the word “Next” and get through it fine. Just remember to choose Upgrade when prompted unless you’ve previously upgraded and activated Windows 10 on this computer.
When you first boot the computer you’ll see a screen like this one:
Click Next and you’ll be taken to the Install now button screen. Which obviously you should click.
At this point you can choose whether you want to upgrade Windows or install a new custom install. Since we’re recommending that everybody install into a virtual machine or on a test PC, you should select Custom here.
Update: You should probably choose to Upgrade the first time, because the license key might not work otherwise.
At this point you’ll need to pick where to install Windows 10. You might need to delete or create a partition, but if you are using a virtual machine, you can just click Next.
And now it will install.
Once the PC reboots again, you’ll be able to select the settings like whether Windows Updates are enabled (they aren’t allowed to be disabled in the preview). We’d recommend just using the express settings if you are using a test machine — use Custom if you’re really going to use the computer.
And now you can sign into your Microsoft account. We’d recommend using a Microsoft account because otherwise you won’t be able to use half of the new features and you may as well use Linux or stick with Windows 7.
If you’ve setup your account properly you’ll probably be asked to verify it in the middle. We excluded those steps from this article, but they are pretty simple.
Now you’ll be asked how to setup the PC. Since we wanted to test everything as a new computer, we chose to set it up as a new PC instead, but you could copy all your settings from another computer if you wanted to.
Want to use OneDrive? It’s nicely integrated into Windows, so we just left it alone.
And now a colorful screen that tells us things are happening.
And finally, we are at the desktop! Note that the desktop on the full release of Windows 10 looks different, and this screenshot came from a pre-release version.
Now click that Start button. Click it. You know you want to.
You can perform a clean installation of Windows 8.1 if you purchased Windows 8.1 on DVD or purchased a download of Windows 8.1. A clean installation typically means formatting your hard drive before installing Windows, so make sure that you have backed up your files and created recovery disc by MSI BurnRecovery tool before proceeding.
To perform a clean installation using a DVD or USB flash drive
If you bought Windows 8.1 on DVD or created a DVD or USB flash drive when you purchased and downloaded Windows 8.1, follow these steps to perform a clean installation.
1. Turn on your PC so that Windows starts normally, insert the Windows 8.1 DVD or USB flash drive, and then shut down your PC.
2. Restart your PC. Your laptop will boot from Windows 8.1 DVD or USB flash drive. Press any key when prompted by message “Press any key to boot from CD or DVD…”.
If you restart your PC and your current version of Windows starts, you might have to change the boot order in your PC's BIOS settings so that your PC boots from the media.
To change the boot order, you'll generally press Delete key immediately after you turn on your PC. When you get into BIOS Setup Menu, please select Boot tab and set your media as the first boot order.
Move to Save & Exit tab, select [Save Changes and Reset] and leave BIOS Setup Menu.
3. Please setup language along with other preferences and click [Next].
4. Click [Install now] to start the process.
5. Enter the product key to activate Windows 8.1 and click [Next]. (You should find the key in the disc package or in a message that shows you bought Windows. If not, please contact disc provider.)
6. Accept the license terms and click [Next].
7. Choose the installation type you want. MSI recommend [Custom: Install Windows only (advanced)].
8. Delete all existing partitions by selecting one partition at a time and then click [Delete] link.
9. Press [OK] when prompted by the message.
10. All the space on the hard drive is now unallocated. Please create partitions by clicking[Drive options (advanced)].
11. Click [New] and decide a proper partition size for the partition.
12. Windows will create another partition to store system files in. Please press [OK]. Follow step 10 to create partitions for the rest of unallocated space if required.
13. Select one partition and click [Format] link to perform partition format.
14. You will be prompted to confirm the process. Press [OK]. Format other partitions as well except the one reserved for system files.
15. Select the partition where you want to install Windows to and press [Next].
16. Windows 8.1 is being installed and it will require several reboots during the process.
17. Please follow onscreen instructions to personalize computer settings.
18. Windows 8.1 is now installed successfully. Please perform Windows update and install the latest firmware/driver/app updates downloaded from MSI website.